
Welcome to the Paper Secrets Spooky Blog Haunt.

I have made a couple Wall Art projects to share with you today!
This Witch wall hanging was super easy to create! I took a 9x9 canvas and Mod Podged some newspaper clippings right onto it. Then I painted the edges black. I used the "A Child's Year" cricut cartridge to cut the witch out at 7". I Mod Podged that on top and voila! 30 minute project!!
 Supplies:
9x9 Canvas
Newspaper
CTMH Black Cardstock
Mod Podge
Cricut: A Child's Year
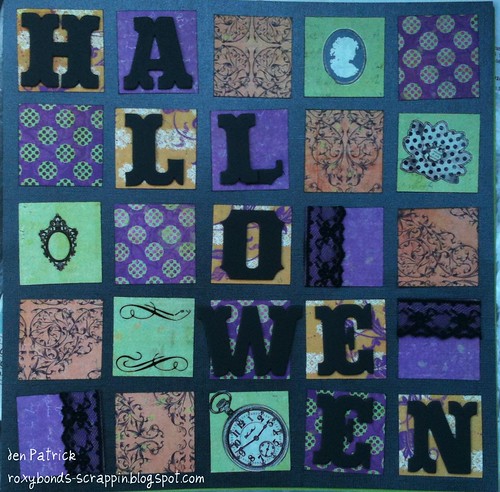
This HALLOWEEN Wall art is a 12x12 scrapbook page that could easily be framed or attached to a canvas and displayed on the wall or mantel! I cut 2x2 squares of patterned paper and arranged them in a slightly messy pattern. All edges were inked in black. I used some Blackboard Chipboard by Cosmo Cricket for the letters. This project came together very easily as well!
 Supplies:
Prima patterned paper
Cosmo Cricket Blackboard chipboard letters
Bazzill Black bling cardstock
misc Rub-ons
CTMH Archival Black ink
Misc. Black lace
Here are a couple more Halloween projects previously featured on my blog:
Thriller Card:

Halloween Through The Years Mini Album

BLOG CANDY:
1- Become a follower of my blog (or tell me you are already)
2- Leave a comment here
3- Join my mailing list (link on left side) for a bonus entry!
Enter to win this stamp set by Close To My Heart CTMH from ME!!!! (shipping to US & Canada only)
D1442 THRILLER

Remember to leave a comment on all 31 blog posts for your chance to win 1 of the 3 treats Paper Secrets is giving away. Once you have visited ALL 31 blogs- go HERE to enter to win one of THREE grand prizes!!
Your next stop will be Kathy C's Blog.
In case you get lost, you can find a complete blog list here...
http://papersecrets.friendhood.net/blog-candy-blog-hops-f5/2010-paper-secrets-spooky-blog-haunt-oct-15-18th-t1014.htm
I have made a couple Wall Art projects to share with you today!
This Witch wall hanging was super easy to create! I took a 9x9 canvas and Mod Podged some newspaper clippings right onto it. Then I painted the edges black. I used the "A Child's Year" cricut cartridge to cut the witch out at 7". I Mod Podged that on top and voila! 30 minute project!!

9x9 Canvas
Newspaper
CTMH Black Cardstock
Mod Podge
Cricut: A Child's Year
This HALLOWEEN Wall art is a 12x12 scrapbook page that could easily be framed or attached to a canvas and displayed on the wall or mantel! I cut 2x2 squares of patterned paper and arranged them in a slightly messy pattern. All edges were inked in black. I used some Blackboard Chipboard by Cosmo Cricket for the letters. This project came together very easily as well!
Prima patterned paper
Cosmo Cricket Blackboard chipboard letters
Bazzill Black bling cardstock
misc Rub-ons
CTMH Archival Black ink
Misc. Black lace
Here are a couple more Halloween projects previously featured on my blog:
Thriller Card:

Halloween Through The Years Mini Album

BLOG CANDY:
1- Become a follower of my blog (or tell me you are already)
2- Leave a comment here
3- Join my mailing list (link on left side) for a bonus entry!
Enter to win this stamp set by Close To My Heart CTMH from ME!!!! (shipping to US & Canada only)
D1442 THRILLER
Remember to leave a comment on all 31 blog posts for your chance to win 1 of the 3 treats Paper Secrets is giving away. Once you have visited ALL 31 blogs- go HERE to enter to win one of THREE grand prizes!!
Your next stop will be Kathy C's Blog.
In case you get lost, you can find a complete blog list here...
http://papersecrets.friendhood.net/blog-candy-blog-hops-f5/2010-paper-secrets-spooky-blog-haunt-oct-15-18th-t1014.htm
Comments