
The 2013 Close To My Heart Convention is well underway!
If you want LIVE UPDATES on Convention happenings, NEW product announcements and PICTURES---
*Follow me on Facebook: http://facebook.com/roxybondsctmh
*Follow me on Twitter: http://twitter.com/roxybonds
This Spring, STARBURST cards have popped up ALL OVER!!!! I finally sat down to make one (or a whole bunch) and they're oddly addicting!
Here's the first one I ever did:
 I used the Clementine paper pack and Clementine Canvas Compliments for this card. I made it on a Die Cut card.
First, here are the steps to take....
*Cut 1.5" x 5.5" strips of patterned paper (double sided is best).
*Take strip and turn it in your cutter so that it's diagonal. Line up opposite corners along your cut line and CUT. Now you have 2 diagonal strips


*Mark the center of your card base.

*Mark where your bottom piece of paper will lay (it will cover the bottoms of your strips).

*Take 2 of your diagonal strips, and lay them STRAIGHT sides next to one another, adhere.

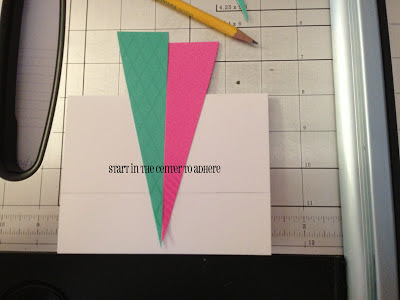
*Now, fill in the rest of your diagonal strips. It doesn't matter whether you line them up straight sides to the left or right.

*Adhere your bottom cardstock/paper over the points of your strips.

*Cut off the excess at the top of your card.

*Stamp, embellish and VOILA!
.JPG)
**This card uses the embossed cardstock from Dream pop, Cricut Artiste shape, A True Thank You stamp set- colored in Cotton Candy, Lagoon & Creme Brule markers, black shimmer trim and bling buttons.
And here's the one that I made for my daughter's 5th Birthday:
 Here I found as many PINK papers as I could: Chantilly, Dream Pop, Lucy & Stylin. I added the Colonial White ribbon at the bottom, and stamped Happy Birthday with Say it in Style. I used Opaque Pearls to make the "5".
Tomorrow I will show you ANOTHER way of doing a Starburst Card :)
If you want LIVE UPDATES on Convention happenings, NEW product announcements and PICTURES---
*Follow me on Facebook: http://facebook.com/roxybondsctmh
*Follow me on Twitter: http://twitter.com/roxybonds
This Spring, STARBURST cards have popped up ALL OVER!!!! I finally sat down to make one (or a whole bunch) and they're oddly addicting!
Here's the first one I ever did:

First, here are the steps to take....
*Cut 1.5" x 5.5" strips of patterned paper (double sided is best).
*Take strip and turn it in your cutter so that it's diagonal. Line up opposite corners along your cut line and CUT. Now you have 2 diagonal strips


*Mark the center of your card base.

*Mark where your bottom piece of paper will lay (it will cover the bottoms of your strips).

*Take 2 of your diagonal strips, and lay them STRAIGHT sides next to one another, adhere.


*Now, fill in the rest of your diagonal strips. It doesn't matter whether you line them up straight sides to the left or right.

*Adhere your bottom cardstock/paper over the points of your strips.

*Cut off the excess at the top of your card.

*Stamp, embellish and VOILA!
.JPG)
**This card uses the embossed cardstock from Dream pop, Cricut Artiste shape, A True Thank You stamp set- colored in Cotton Candy, Lagoon & Creme Brule markers, black shimmer trim and bling buttons.
And here's the one that I made for my daughter's 5th Birthday:

Tomorrow I will show you ANOTHER way of doing a Starburst Card :)
Comments